How To Make a WordPress Website in 5 Steps
Learn how to create a WordPress website from scratch as a beginner.
Starting a WordPress website isn’t much different from other page builders. You’ll need to follow these 9 steps: select a domain name, choose a web hosting, install WordPress, choose a theme, customize your site, install plugins, add content, perform SEO and start a blog.
This guide will take you from absolute zero to a beginner. Continue reading to discover how to build a WordPress website yourself.
Why WordPress Is The Best CMS?
WordPress was launched in 2003 and has become the most popular choice for Content Management Systems (CMS) for websites and blogs. The reason for this is, it allows you to create dynamic content most effectively and efficiently.
Here are three reasons why WordPress is a best choice:
- It’s free to start: WordPress allows you to get started for free. Of course, there are some hidden costs involved, such as purchasing a domain, web hosting, and plugins or custom themes, but that’s true for all CMSs.
- SEO-friendly with plugins: Yoast and Rank Math make it easy to optimize your WordPress site for search engines like Google and Yahoo.
- Limitless customizable options: It’s truly the only CMS out there that you can fully customize using thousands of plugins, themes, and codes you can find all over the internet. The best part is that you don’t even need to be a technical nor coder.
Raido Linde CEO of WordPress Websites Designer says: “I have tried many other CMS and website builders, but each one has some missing features or functionality. That’s why we now only stick with WordPress. It will save you time, money, and headaches in the long term.”
For you luck gone are the days when you had to hard-code your site. Instead we will show you how to use themes to quickly create a WordPress website from scratch.
Step 1: Select a Domain Name
A domain name represents your website’s name through which visitors can access your site. It should be short, memorable, and either your business name or closely related to your niche or main keyword.
You can usually purchase your domain name from your web hosting provider, which is why you need to read the next step.
Step 2: Choose a Web Host
Web hosting makes your site accessible on the internet.
Technically, you could host your site locally at home with your own server or use WordPress.com, which is a fully hosted website platform.
However, we recommend using WordPress.org, which is free when you use a web hosting provider, such as GoDaddy, Hostinger, or SiteGround.
Step 3: Install WordPress
After you have set up the domain and hosting, it’s time to install WordPress.
The web hosting providers mentioned above and many others typically offer one-click WordPress installation through cPanel, Softaculous, or custom functions. This makes the process easy, even for beginners.
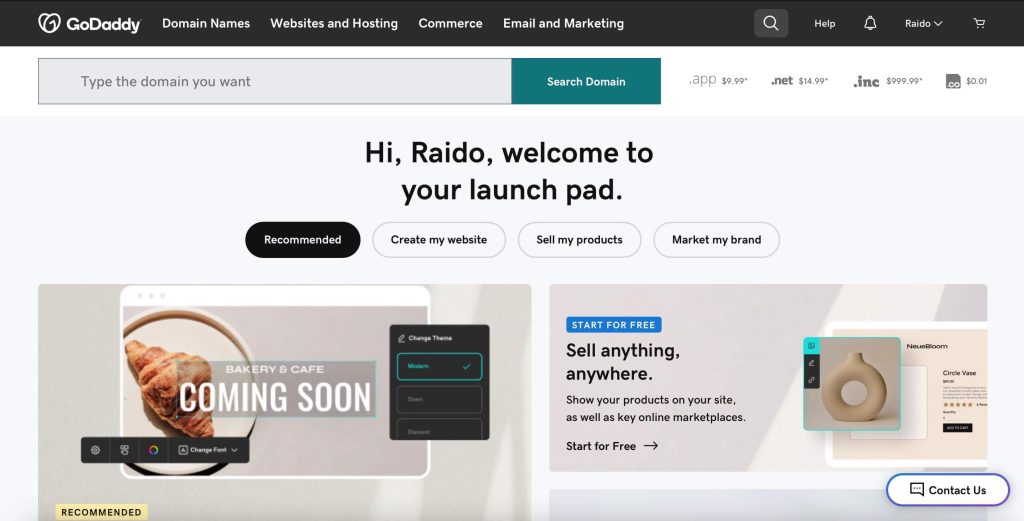
1. Log In Yo Your GoDaddy Account
Purchase the GoDaddy hosting and log in to your account using your username and password.
2. Access Your Products
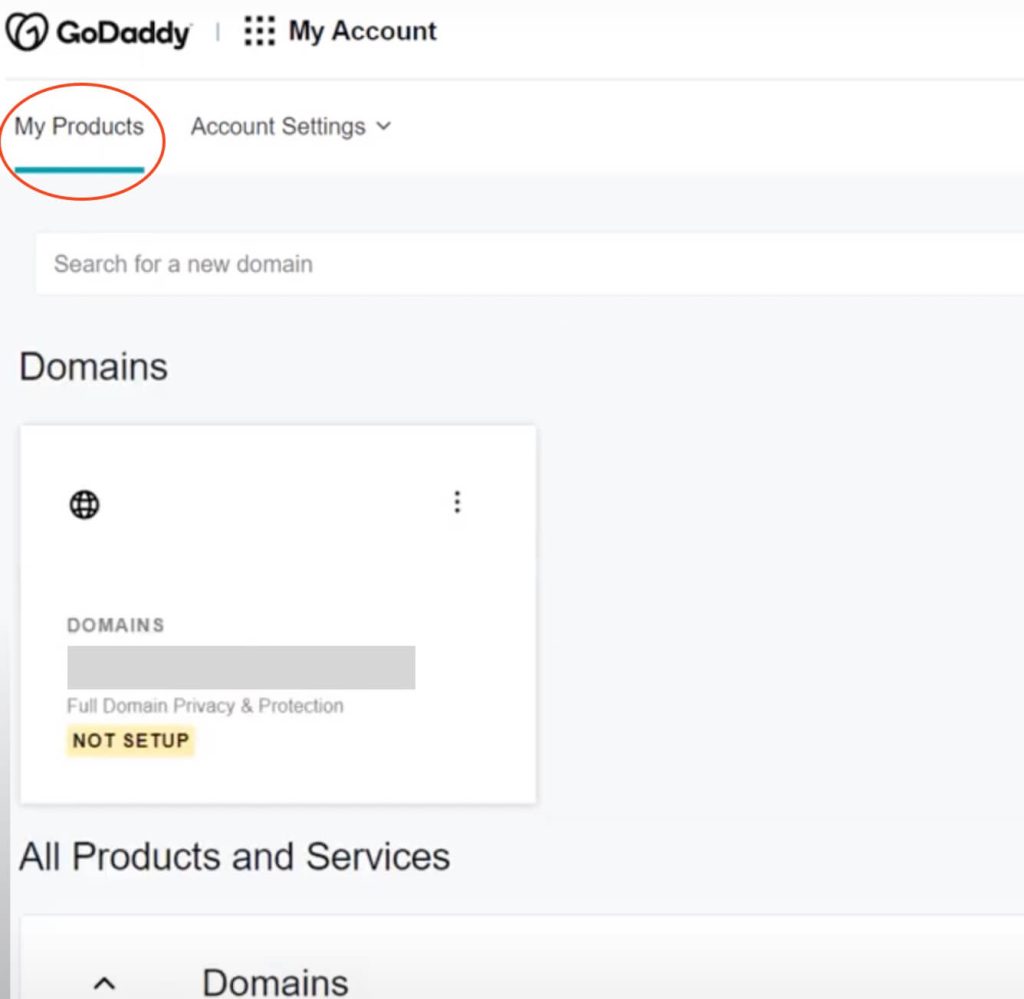
Go to the “My Products” section. This should display a list of the products and services you have with GoDaddy.
3. Find Your Web Hosting
Locate your “Web Hosting” service from the list of products.

4. Access Your cPanel
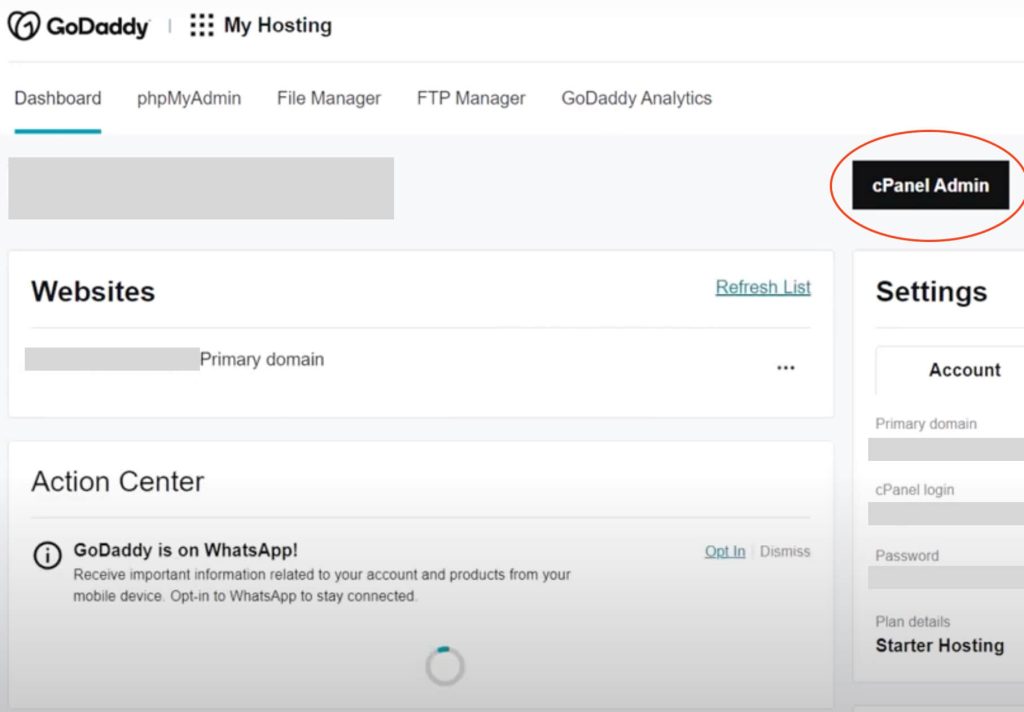
Find “Starter Linux Hosting With cPanel” and click on “Manage” to access it. Once you’re inside, click “cPanel admin” button.
5. Locate The WordPress Installer
Inside your cPanel, navigate to the “SOFTWARE” section and click on “Installatron Applications Installer.” Choose or search for “WordPress” from the options.

6. Start The Installation
You should see an option to install WordPress. Click on it to begin the installation.

7. Configure The Installation
Fill in the necessary details for your WordPress site, including choose the domain where you want to install it, the site name, the admin username, password, and email address.
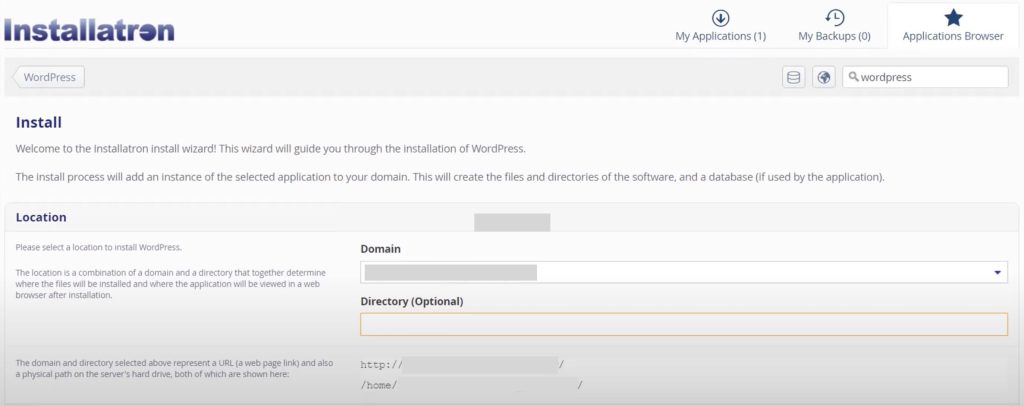
Take note of the admin username and password as you will need it to log in to your site.
Leave everything else empty or set to default, including the directory, unless you are installing a staging environment or adding a second language as a subdirectory, for example, France on domainexample.com/fr/
8. Complete The Installation
Click the “Install” or “Finish” button to complete the installation process.

9. Log In to Your WordPress Site
To access your site and start customizing it, add “/wp-admin” to the end of your domain name (e.g., yourdomain.com/wp-admin) and log in using the admin username and password you set during the installation.

Step 4: Choose a theme for WordPress website
Now it’s time to install a theme for your website. Themes are essential components of building and customizing WordPress websites. In simple terms, they are ready-made templates that you can use and customize to your liking.
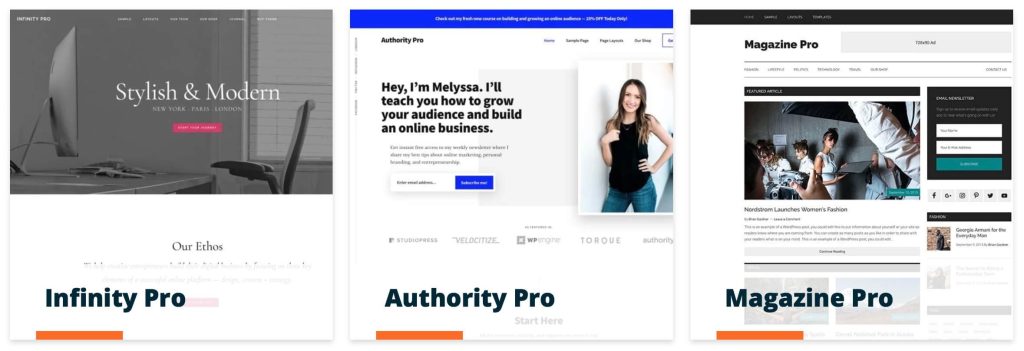
There are hundreds of themes to choose from, but two of the most trusted ones, based on high-speed performance and SEO friendliness, are:
Astra themes – Utilize their free or paid themes
Studiopress themes – Obtain for free with Wp Engine hosting
Consider websites purpose
When selecting a theme from the mentioned providers, it is important to identify the website’s intended purpose:
- Busienss
- E-commerce Stores:
- Blogs
- Membership
- Portfolio
- Educational
- Restaurant
- Health & fitness
- Real estate
- Travel & Tourism
- Event
Why choose industry specific theme?
Jessica Thornsby, Technical writer of Envato themes and co-author of iWork says: “industry specific themes will come with the necessary setup, features, plugins, and design for your needs. Starting with the right theme makes it significantly easier for you to create the perfect website.”
Step 5: Customize The Theme
Before customizing your theme, you should define your brand identity.
This involves determining your brand’s color scheme, custom graphics and media and typography.
Color Scheme: Stick to a cohesive color scheme that matches your brand, and avoid using too many colors, which can make your site appear chaotic.
Custom Graphics and Media: Create or outsource custom graphics, images, and videos that align with your brand. High-quality visuals can enhance the overall appeal of your website.
Typography: Choose readable and aesthetically pleasing fonts for your content. Use a maximum of two fonts per site as fonts can increase your page load time: one for headings and one for paragraphs, or just stick with one throughout your content.
Now customizing your website on WordPress involves the following steps:
Customize features and layouts: Once the theme is installed, you can customize it using the WordPress Customizer or the Theme Options section. While some themes offer you the ability to modify layouts, colors, fonts, and other design elements, others may require you to purchase the pro version for additional customization options.
Add Widgets: You can manage and customize widgets in the “Widgets” section to enhance the functionality of your website. These can include elements like a search bar, recent posts, categories, tags, and more.
Set Up Navigation Menus: Configure your website’s navigation menus under the “Appearance” section. Create menus for different sections of your website and assign them to specific locations, such as the header or footer.
Step 6: Install Necessary Plugins
Plugins enhance your website’s basic features, functions, and designs. There are thousands of plugins available in the WordPress plugin collections, many of which offer free plans and paid options if you need to upgrade these freely available functions.
10 essential plugins that you need when building a WordPress website:
- SEO Plugin: Boost your website’s search engine visibility with an SEO plugin like Yoast SEO or Rank Math.
- Caching Plugin: Improve your website’s loading speed with a caching plugin like WP rocket.
- Image Optimization: Compress and optimize your images to enhance website performance and reduce load times with an image optimization plugin like Smush or ShortPixel.
- Social Sharing: Make it easy for visitors to share your content on social media by using a social sharing plugin like Shareaholic or AddToAny.
- Analytics :Track your website’s performance with a plugin like Google Analytics
- Contact Form: Install a contact form plugin like Contact Form 7 to allow your visitors to easily get in touch with you. This plugin provides a simple way to create and manage contact forms on your WordPress site.
- Subscription and Newsletter: Build and manage your email list with a subscription and newsletter plugin like MailChimp for WordPress.
- Backup Plugin: Ensure the safety of your website’s data by using a backup plugin like UpdraftPlus
- Anti-Spam Plugin: Protect your site from spam comments and contact form submissions by installing an anti-spam plugin like Akismet.
- Security Plugins: Enhance your website’s security with a plugin like Wordfence. It offers firewall protection, malware scanning and login security, and more to keep your site safe from hackers.
Essential plugins for eCommerce site:
- Ecommerce: If you plan to run an online store, install WooCommerce. It’s a powerful and customizable e-commerce plugin that enables you to sell products from your WordPress website.
- Payment Gateway Integration: To accept payments online, integrate a payment gateway plugin such as PayPal, Stripe or Klarna
- Inventory Management: To efficiently track and manage your product inventory, consider an inventory management plugin like WP Inventory Manager.
- Shipping and Delivery: To set shipping rates, print labels, and offer real-time shipping quotes consider plugin like WooCommerce Shipping.
- Checkout Step Customizer Tailor your checkout process to meet your specific needs with a plugin like Checkout Field Editor for WooCommerce.
- Cart Plugin: Enhance the shopping experience by incorporating a cart plugin like Cart Popups.
- Checkout Field Customizer: Optimize your checkout process with a plugin like Checkout Field Editor for WooCommerce.
- Print PDF Invoice: Generate professional and customized PDF invoices for your customers using a plugin like WooCommerce PDF Invoices & Packing Slips.
How to Install WordPress Plugins:
- Locate plugins from the WordPress dashboard and click on “Add New.”
- Use the search bar to find the desired plugin. WordPress will automatically populate relevant plugins related to your search.
- Locate the desired plugin and click “Install.” Once it’s done, click “Activate.”
- Access the plugin settings to configure them, as only a few handful of plugins work instantly without any configuration.
How to get help with plugins?
Whether you need help due to an error, missing features, or simply not knowing how to set it up, the first step is to locate the plugin’s page and read their manuals.
If that doesn’t help, you can visit the WordPress specific plugin’s support page and submit a ticket directly from there.
To do so follow these steps:
- Log in to Your WordPress Dashboard: Access your WordPress website by logging in with your credentials.
- Locate the Installed Plugin: From the left-hand menu, click on “Plugins” and then select “Installed Plugins.”
- Choose the Desired Plugin: Find the plugin for which you need support and click on its name to open the plugin details page.
- Find the Support Information or Help Section: Many plugins include a “Support” or “Help” section within their details page. Click on the support link provided by the plugin developer.
- Visit the Plugin WordPress Support Page: This link will usually take you to the plugin’s support page on the WordPress Plugin Directory or the developer’s website.
- Submit a Support Ticket: Submit a support ticket and provide details about the issue you’re experiencing.
- Wait for a Response: The plugin’s support team will review your query and respond with assistance, guidance, or a solution to your problem.
Step 7: Add Content
Adding content on WordPress is relatively easy as well. All you have to do is navigate to “Pages” or “Posts” and add the text and images.
With theme-based websites, you can easily change the example pages content and have the project ready in a matter of days.
What content is necessary?
According to Google, you need a minimum of 3 pages for:
- Homepage – The homepage is the first page where visitors land, and it should clearly communicate why they should choose you, who you are, and what you offer. Also, add your blog posts at the end of the homepage.
- Contact Us – Not only does it make it easy for users to contact you, but it also builds trust on your website. You should provide information on how to contact you, such as an email address, phone number, or contact form.
- About Us – Google values authenticity, so this page helps you gain trust and credibility. Provide information about you, your business/website, and the team. Additionally, you may include your purpose, values, and mission.
Additionally, we recommend adding a minimum of 4 more pages:
- Blog page and posts – Regularly posting on your site helps build trust with search engines, and relevant topics help you generate organic traffic.
- Service or Product pages – These are essential for showcasing your offerings. Clearly articulate your features, benefits, and pricing.
- Privacy and Cookies Policy (Also, add GDPR if you offer services or have visitors in the EU).
- Sitemap – A page that includes links to all published pages on your site. This allows Google to crawl and rank your content faster. Additionally, coherent organization follows the best practices of search engine guidelines.
In the footer, we recommend having:
- Logo
- Website Description
- Contact details
- Opening hours
- Social media buttons
- Privacy Policy
- Copyright (C)
If you use AI, alcohol, or affiliate links in your content, you need to add a disclaimer somewhere on that page. Doing so ensures that you follow search engine guidelines and hence rank well in search results.
NB! The absence of a disclaimer is often a reason why your blog or website is declined from AdSense.
Step 8: SEO
SEO is considered one of the most challenging online marketing practices because it involves numerous moving parts, strategies, and skills that take years to master.
However, there are a few small things for quick and long term wins when building a new WordPress site, and it goes like this:
Follow Google’s EEAT Guidelines.
EEAT, which stands for “Experience, Expertise, Authoritativeness, and Trustworthiness,” is the first thing to consider when optimizing your WordPress site.
It plays a fundamental role in determining a website’s credibility, authority, and hence its search engine rankings.
- Experience (E): Refers to the overall user experience on your site. Three main factors that determine this are mobile responsiveness, site speed, and design flow. These elements can either provide a great or poor user experience when visitors interact with your website, subsequently affecting your rankings. So, make sure you have a fast and SEO-friendly theme, as well as quality, fast web hosting
- Expertise (E): is based on the skill and knowledge demonstrated in your content. If you write about something, it should demonstrate that what you say is reliable and accurate. This means you need to have in-depth content showcasing your experience or expert opinions. Additionally, each page or post should contain the author’s name and profession with a link to a profile page, which should include links to your social media
- Authoritativeness (A): Focuses on understanding the reliability and reputation of your website within your niche. It considers endorsements and reviews from customers, as well as backlinks from other blogs, websites, and businesses.
- Trustworthiness (T): Involves understanding whether you use ethical practices and demonstrate integrity and confidence to users when they use your website and its content. Here, you should have an SSL certificate, GDPR compliance (with a privacy and cookies policy), and Cloudflare for extra protection.
There are a few additional tips and tricks involved in website development, SEO and maintaining your site that we have explored in our general “how to create a website” article. Go read it.
Step 9: Start a Blog
After you have published your site, it is time to start writing blog posts.
Blogging is often overlooked, but it is the most important factor determining your overall website success, especially when considering SEO and generating organic traffic.
The absence of a blog is usually the number one issue why your site isn’t in the top page results, regardless of whether you create links or not.
How to create a 1-year blog strategy:
- Analyze Competitors: Research your competitors and analyze their blogs with Semrush or Ahrefs to understand their content strategy, target audience, and successful blog posts.
- Define Main Categories: Determine 4-6 main categories or topics that align with your website’s niche and audience. These categories will be the foundation of your blog.
- Identify High-Performing Posts: Identify the high-performing and popular posts from your competitors. These serve as inspiration for your content.
- Generate Blog Post Ideas: For each of the main categories, collect a list of 20 blog posts. Then, brainstorm and create your own ideas based on these. This will result in a total of 80-120 potential blog post topics. Ensure that these topics are relevant and valuable to your target audience.
- Content Creation: Begin weekly creation of blog 1-3 posts. You can either write the blog posts yourself or outsource the content creation to freelancers or content writers.
Steps to create an internal linking strategy for the blog:
- Category to Post Links: Ensure that your category pages have visually prominent images, a short description, and a link that leads to individual blog posts within that category. This encourages users to explore related content.
- Breadcrumbs for Category Navigation: Implement a breadcrumb navigation system to provide users with clear paths to navigate between categories and individual posts.
- Next Post Link Within Content: Within each blog post from the same category, include a links to the relevant post using the post title or a keyword as anchor text. Also, at the end of the blog post, have links to relevant blog articles.
By incorporating these linking practices, you establish content clusters, enhancing the relevance of your website and boosting SEO for individual categories and overall website. This internal linking strategy has tremendously helped us improve our website’s search engine rankings. Try it out!
FAQs About Building a Website
Share this post:


Leave a Reply